Image Diff: A Practical Guide to Pixel-Level Comparison and Visual Regression
Compare two images pixel by pixel with threshold control and side-by-side, difference, and heat-map modes. Learn how to run visual regression checks in your browser with Image Diff.
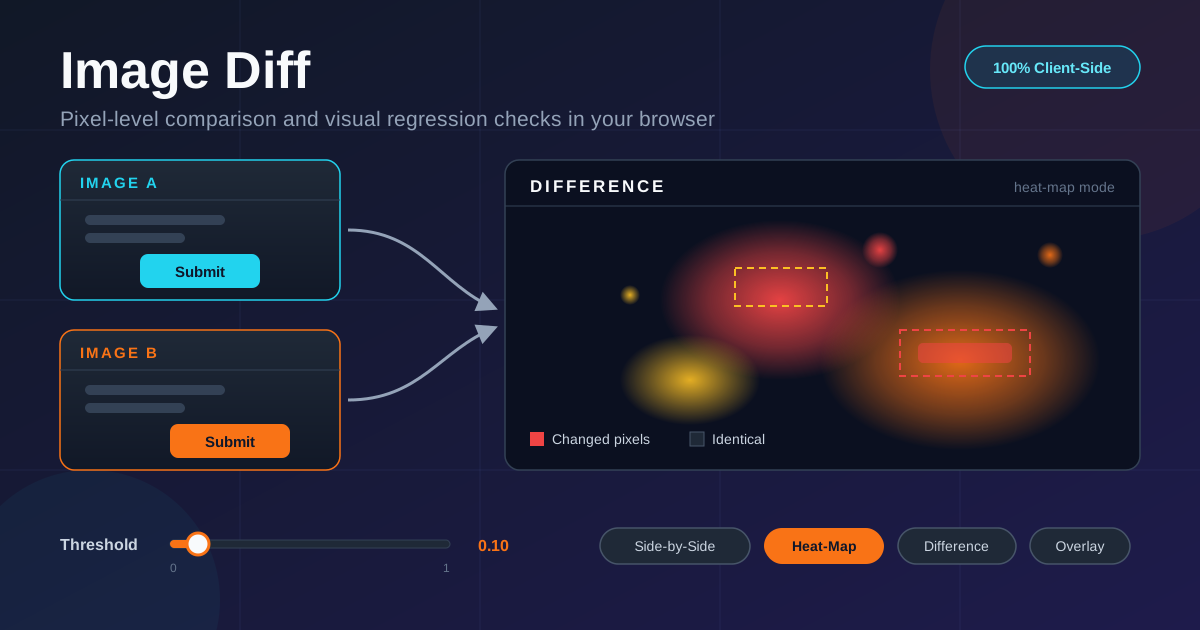
Table of Contents
Image Diff: A Practical Guide to Pixel-Level Comparison and Visual Regression
Visual regression is the silent killer of frontend releases. A stylesheet tweak nudges a button three pixels sideways, a font swap changes line wrapping, and nobody notices — until a customer does. One shifted button can ruin a release, because the human eye is a terrible pixel comparator: it smooths over exactly what a pixel diff catches instantly.
Image Diff closes that gap. Load two images and the tool compares them pixel by pixel, flagging every region where the difference exceeds a threshold you control. Four view modes — side-by-side, difference, heat-map, and an overlay of the original pair — take you from "something changed" to "here is exactly what changed" in seconds, entirely in your browser with no uploads and no account.
Why Use Image Diff?
- The eye misses what a pixel diff catches. A two-pixel shift inside a dense dashboard is invisible in manual review but appears as a highlighted region immediately.
- It turns opinions into evidence. A highlighted diff is an objective artifact you can attach to a pull request, a ticket, or a release checklist.
- Threshold control separates signal from noise. Antialiasing introduces tiny deltas; the slider ignores sub-perceptual differences while flagging real ones.
- Nothing leaves your machine. The comparison is 100% client-side, so it is safe for unreleased designs and work under NDA.
- No installs, no CI setup, no cost. Use it for a one-off check in a meeting or a quick sanity test on a staging build.
- Four modes cover every question. Side-by-side for review, difference for confirmation, heat-map for density, overlay for position.
Key Features
| Feature | What it does |
|---|---|
| Pixel-by-pixel compare | Computes the difference for every corresponding pixel in both images. |
| Threshold control | Ignores per-channel deltas below a value you set, taming antialiasing noise. |
| Side-by-Side mode | Shows both images next to each other for a classic visual review. |
| Difference mode | Renders changed pixels against an unchanged baseline for a strict verdict. |
| Heat-Map mode | Visualizes the density of change so large regressions glow brighter than specks. |
| Original pair overlay | Blends both images so you can judge exactly how far elements moved. |
Worth calling out:
- The threshold is the single most important control. At zero the tool is brutally honest; higher values behave like a tolerant human reviewer.
- Modes are complementary, not redundant. Sessions typically start with heat-map to locate change clusters, then overlay or side-by-side to interpret them.
- Highlights scale with the problem. One glyph edge is a speck; a broken grid is a region — legible at a glance.
How to Use
- Load the baseline image. Drop the version you consider correct into the first slot — usually the "before" screenshot.
- Load the candidate image. Capture both with the same method so you compare the UI, not the capture pipeline.
- Set the threshold. Start high, then lower it until the diff shows only meaningful differences.
- Switch view modes to diagnose. Difference for a strict yes-or-no picture, heat-map to find dense clusters, overlay to judge positional drift.
- Act on the highlights. Each area is either an intended change (update your baseline) or a regression (file it with the diff as evidence).
Thresholds, Modes, and Antialiasing Lies
Under the hood the comparison is strict. For every pixel position, the tool reads the red, green, and blue channels from both images and computes the per-channel delta. If any channel differs by more than the threshold, the pixel counts as changed; otherwise it is identical. That is the whole decision — which is why the threshold matters so much.
The catch is that antialiasing lies to pixel diffs. Every glyph in a modern UI has partially transparent edge pixels blended into the background. If a layout shifts by a single pixel, every blended edge around it changes slightly, and hundreds of pixels now differ by a few units per channel. At a low threshold your diff drowns in these false positives; the actual bug is buried in antialiasing confetti. Raising the threshold filters out sub-perceptual deltas while a moved button or a wrong color still exceeds it easily.
Each mode answers a different question:
- Side-by-Side keeps both images visible for review conversations — ideal when a human must confirm a change is intended.
- Difference is the binary truth: if it is clean, nothing changed beyond the threshold. The fastest way to confirm a fix broke nothing else.
- Heat-Map shows the density of change. Scattered specks mean cosmetic noise; bright clusters mean structural breakage.
- Overlay of the original pair localizes movement: double vision makes drift obvious and measurable.
One warning about size mismatches. Pixel comparison only makes sense when both images share the same dimensions; otherwise coordinates stop corresponding. Crop or resize inputs to a common size before trusting any diff output.
A worked example: a dependency update lands on your pricing page and the build passes. Screenshot the pricing card before and after, diff at threshold 0.1 — clean. Lower it to 0.02 and a heat spot appears over the button's edge; overlay shows its ghost one pixel to the left. Caught and located in under a minute.
Practical Use Cases
UI Regression Checks After CSS Changes
Before and after any risky change — a CSS refactor, a dependency bump, a design-token migration — capture the same pages and diff them. Intended changes become reviewable artifacts; unintended ones become tickets, before users find them.
Design-versus-Implementation Review
Export the design mock, screenshot the implemented page, and diff them at a sensible threshold. The heat-map shows where implementation drifts from spec — collapsed spacing, a 12px radius instead of 16px, a slightly wrong gray.
Before-and-After Optimization Proof
When you compress assets or change an image format, diff the before and after outputs. A high-threshold diff proves the visual result is effectively identical, and the file-size numbers prove the win.
Asset Pipeline Verification
If your build generates icons, banners, or thumbnails, diff its outputs against a known-good set. Silent generator regressions — a shifted watermark, a font swap in banners — surface immediately.
Best Practices
- Keep both images the exact same dimensions. Resize or crop mismatches before comparing.
- Capture at the same scale and device pixel ratio. A 1x against a 2x screenshot is a diff of zoom levels, not of UIs.
- Prefer screenshots over photos. Screenshots are deterministic captures; photos carry sensor noise the threshold must hide.
- Start the threshold high, then lower it. Never start at zero, or antialiasing will bury you.
- Diff stable states. Disable animations and hide cursors before capturing.
- Archive your baselines. Keep known-good images with the release they belong to.
See Every Pixel Before Your Users Do
One shifted button can undermine a release — and one clean pixel diff can stop it. Open Image Diff, drop in your before and after screenshots, and get an objective answer in seconds, entirely in your browser.
Related Tools You Might Like:
- Image Comparison Slider — Compare two images interactively with a draggable reveal handle.
- Screenshot Beautifier — Turn plain screenshots into polished, presentation-ready graphics.
- Color Converter — Convert colors between HEX, RGB, and HSL for pixel-accurate styling.
Happy diffing — may your releases be pixel-perfect!
Frequently Asked Questions
Q: Are my images uploaded to a server?
A: No. Both images are decoded and compared entirely in your browser with client-side processing. Your files never leave your machine, making the tool safe for confidential designs and unreleased builds.
Q: What threshold value should I start with?
A: Start around 0.1. Most antialiasing noise disappears while real color and position changes remain visible. Lower it gradually only when you need to catch subtle one-pixel layout drift.
Q: What happens if the two images have different dimensions?
A: Pixel comparison assumes coordinates match, so mismatched sizes cannot be aligned reliably. Crop or resize both images to the same dimensions, and capture with the same viewport and device pixel ratio.
Q: Can it replace a full visual regression testing framework?
A: It complements one. Automated frameworks run hundreds of checks in CI but are heavy to set up. Image Diff is the fast, zero-setup tool for investigating individual diffs before you invest in automation.