How to Split Any Photo into an Instagram Grid of Perfect Tiles
Slice any photo into an N x M grid of tiles for Instagram grid posts with the free Image Grid Splitter — download tiles individually or as a ZIP, and post them in the right order, all in your browser.
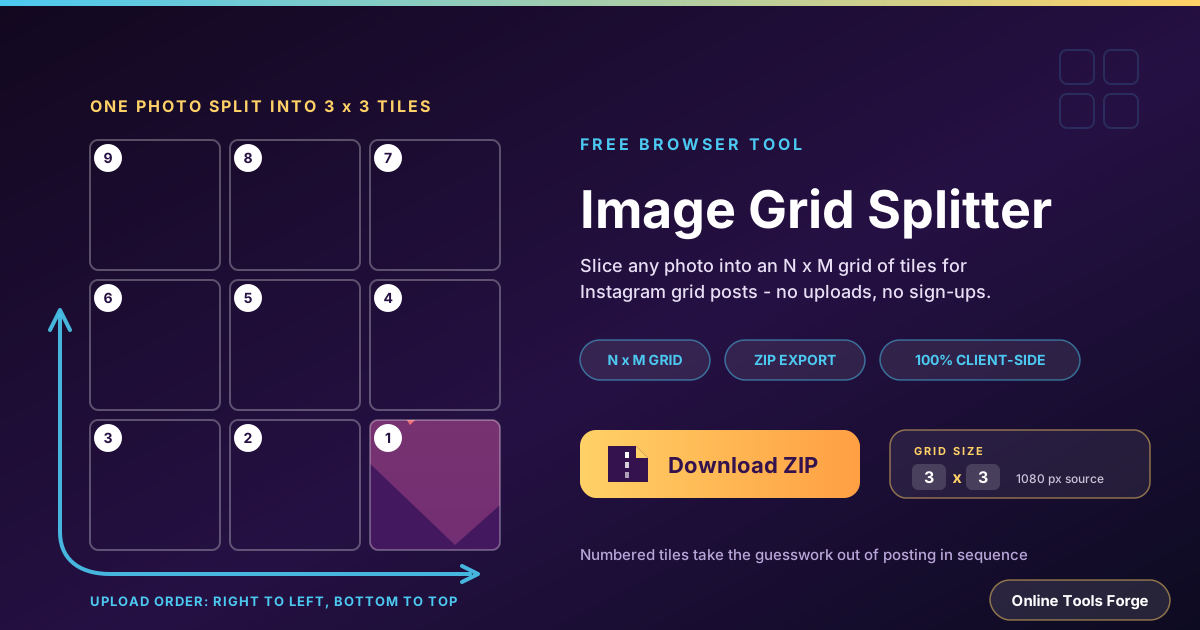
Table of Contents
How to Split Any Photo into an Instagram Grid of Perfect Tiles
Scroll through Instagram long enough and you will land on a profile where nine posts merge into one giant, seamless image. Musicians use it for album launches, brands for product reveals, photographers for portfolio headers — and it stops people mid-scroll every time. The 3×3 profile-grid post remains the strongest Instagram profile flex, and with the free Image Grid Splitter you can create one from any photo in under a minute.
The tool slices a single photo into an N×M grid of tiles, shows a live preview of every cut, and lets you download tiles individually or as one ZIP file. Each tile is named for the correct Instagram upload sequence, which removes the most common way these posts go wrong. Everything runs 100% client-side in your browser: no installation, no account, no watermark, and your photo never leaves your device.
This guide covers the tool's features, walks through the five steps from upload to posted grid, and digs into the upload order trap.
Why Use Image Grid Splitter?
- The profile-grid effect without design software — No cropping nine times by hand or exporting nine unnamed files. The tool slices automatically and labels every tile.
- Any N×M layout, not just 3×3 — Choose 2×2 for a compact statement, 3×3 for the classic grid, or 4×4 and beyond for wallpapers and printable posters.
- Live preview before you commit — See exactly where every cut lands, so a face or logo never gets sliced in half by surprise.
- ZIP download for the full set — One click saves every tile in a single archive, correctly named in upload order.
- Runs entirely in your browser — Your photo is processed locally, making it safe for client work and unreleased material.
- Free and unlimited — No usage caps, no watermarks, no premium tier hiding the useful settings.
Key Features
| Feature | What it does |
|---|---|
| N×M grid slicing | Split any photo into a custom grid of rows and columns |
| Live preview | Watch tile boundaries update as you change the grid |
| Individual tile download | Save any single tile when you only need part of the set |
| ZIP download | Grab the whole set in one archive, named for upload order |
| Instagram upload ordering | Tiles are ordered so you know which one to post first |
| 100% client-side | All slicing happens in your browser; images never leave your device |
| Free, no watermarks | Unlimited splits with clean, unbranded output |
A few details worth knowing:
- Slicing is pure math on the image dimensions, so there is no quality loss beyond the crop itself.
- The upload ordering matters more than it sounds — Instagram displays profile grids newest-post-first.
- Need just one strip of a wide image, like the middle third for a banner? Set a 3×1 grid and download only that tile.
How to Use
- Upload your photo — Open the Image Grid Splitter and drop in your image. Square sources work best; 1080 pixels wide is the practical minimum.
- Choose your grid — Set rows and columns. For the classic Instagram effect, use 3×3. The live preview instantly shows every tile boundary.
- Check the preview — If an important subject straddles a cut, adjust the grid or re-crop the source until each tile looks intentional.
- Download the ZIP — Save the complete tile set in one archive, with files named in upload order. Individual tile downloads are available too.
- Upload the tiles in order — Post the tiles one at a time, starting with the bottom-right tile and working right to left, bottom to top. Your profile grid now reads as one seamless image.
The Upload Order Trap
Here is what trips up almost everyone on their first grid post: Instagram's profile grid displays posts newest-first, with the most recent in the top-left cell. Every new post pushes older ones one position right, then down a row. If you upload tiles in natural reading order — top-left first — the image ends up mirrored and scrambled across your profile.
The fix is to post in reverse: bottom-right tile first, then right to left along the bottom row, then up a row and repeat, finishing with the top-left tile last. When the ninth tile lands, the grid assembles into your complete image. This right-to-left, bottom-to-top sequence is the number one rule of grid posting.
The second trap is square versus arbitrary grids. Profile grid cells are square, so only grids made of square tiles line up seamlessly — a 3×3 or 2×2 from a square source. Arbitrary N×M grids from rectangular sources still shine elsewhere: puzzle posts, printable posters, and wallpapers. They just will not form one continuous picture on your profile.
Dimension math matters too. Instagram stores feed images at 1080 pixels wide, so crop your source to 1080×1080 before splitting — that yields 3×3 tiles of 360×360 pixels each. For crisper results, start from 3240×3240 so each tile is a full 1080 pixels and survives Instagram's compression cleanly. For edge alignment, keep faces and logos comfortably inside a single tile, place horizon lines on boundaries rather than across them, and use the live preview until every tile could stand on its own.
Practical Use Cases
The Classic 3×3 Profile Grid
The flagship use case: one striking image across the top nine cells of your profile. It works best with bold, symmetrical compositions — a centered portrait, a landscape with a strong horizon, or a poster-style graphic with the title in the middle tile. Brands use it for campaign launches; creators use it as an instant portfolio statement.
Puzzle Posts and Multi-Part Announcements
A 2×2 set posted to the feed creates a four-part puzzle — perfect for countdowns, before-and-after reveals, or one panorama shared as a sequence. Numbered file names keep the posting order obvious even when several people share the upload duty.
Printable Posters from a Single Image
The same slicing math works offline. Split a large image into a 2×3 or 3×3 grid, print each tile at A3 or A4, and mount the panels as a multi-canvas wall display. A 6000-pixel panorama produces tiles sharp enough for large-format printing at a fraction of the cost of one oversized print.
Slicing Screenshots for Slides and Documentation
Long screenshots are the enemy of readable slides. Slice a tall UI screenshot into horizontal strips with a 1×4 grid and place each strip on its own slide so every step stays large and legible. It also neatly breaks a wide comparison chart into sections for reports.
Best Practices
- Test on a private account first — Post the full sequence privately, check how the grid assembles, then delete before publishing for real.
- Keep source quality high — Start from the largest, cleanest image you have; tiles inherit every flaw in the original.
- Avoid faces crossing tile boundaries — A sliced face reads as a mistake. Keep people and logos safely inside one tile.
- Post the whole set in one session — A half-finished grid looks broken to anyone who visits in between. Schedule the time and upload back to back.
- Mind the 1080-pixel feed width — Crop to a square of at least 1080 pixels wide before slicing; 3240 per side is the sweet spot.
- Edit the full image, not the tiles — Apply filters or color grading before splitting, or the seams will show.
Start Slicing Your Next Grid Post
A nine-tile profile grid looks like an agency produced it, but it takes nothing more than a good photo and a few clicks. Open the Image Grid Splitter, upload your image, pick 3×3, download the ZIP, and post the tiles right to left, bottom to top. It is free, it runs entirely in your browser, and your photo never leaves your device.
Related Tools You Might Like:
- Image Comparison Slider — show before-and-after versions of your photo in one interactive slider.
- Photo Collage Maker — combine several photos into a single collage layout in your browser.
- Image Format Converter — convert your tiles between PNG, JPG, WebP, and more.
Happy grid posting!
Frequently Asked Questions
Q: Is Image Grid Splitter really free and private?
A: Yes. It is free with no usage caps or watermarks, and all slicing happens locally in your browser. Your photo is never uploaded to a server, so it is safe for client work and unreleased material.
Q: Why did my grid post come out scrambled?
A: Almost certainly an upload order problem. Instagram shows the newest post in the top-left cell, so upload the bottom-right tile first and work right to left, bottom to top. Uploading in reading order mirrors the image across your profile.
Q: What resolution should my source image be?
A: Crop to a square of at least 1080 pixels wide before splitting, which gives 360-pixel tiles in a 3×3 grid. For the sharpest results, use a 3240×3240 source so each tile is a full 1080 pixels.
Q: Can I use the tool on my phone?
A: Yes. Everything runs in the browser, so any modern mobile browser works. You can split, download the ZIP, and post the tiles directly from your phone.