LED Resistor Calculator: Size the Current-Limiting Resistor Right
Learn how to use the free LED Resistor Calculator to turn supply voltage, LED forward voltage, and target current into an E24 resistor value, actual current, power dissipation, wattage rating, and the 4-band color code. 100% client-side.
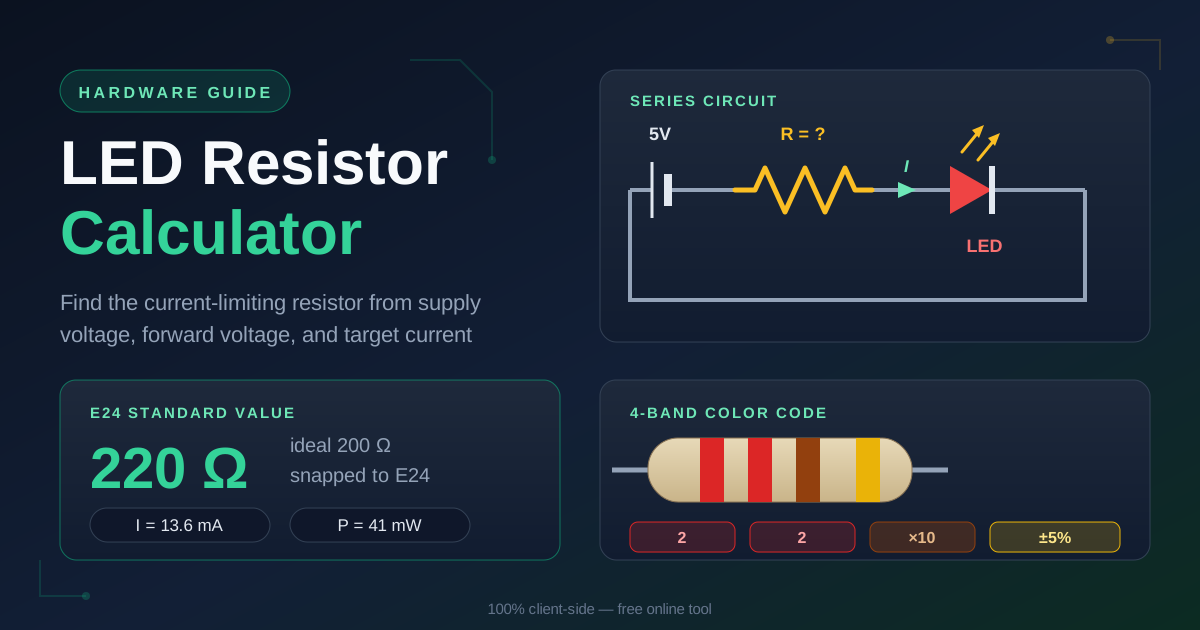
Table of Contents
LED Resistor Calculator: Size the Current-Limiting Resistor Right
An LED is a current-driven device, and it will happily pull far more current than it can survive. Wire one straight across a battery or a microcontroller pin and it flashes brilliantly for a moment, then goes dark for good. An LED without a current-limiting resistor is a one-time-use LED — the series resistor is what turns a moment of glory into years of service.
Our free LED Resistor Calculator does the sizing in one pass. Enter the supply voltage, LED forward voltage, number of LEDs in series, and target current, and it returns the ideal resistance, the closest E24 standard value, the real current it produces, the resistor power with a recommended wattage rating, the LED power, and the 4-band color code. Everything runs 100% in your browser — nothing uploaded. Below, we walk through the tool step by step and work a full example from raw numbers to color bands.
Why Use LED Resistor Calculator?
Here is what the tool brings to your workbench:
- Protect components from the first power-up — The resistor is sized before you close the circuit, so the LED never exceeds its datasheet current.
- Get values you can actually buy — The tool converts the ideal result into the closest E24 value on the shelf.
- See the real current, not the wishful one — Snapping 200 Ω to 220 Ω changes things; the calculator reports what the standard value delivers.
- Size the wattage rating correctly — It computes dissipation and recommends a rating with margin.
- Decode the color code instantly — It prints the 4-band code, red red brown gold for 220 Ω.
- Keep your design data private — All math is 100% client-side; nothing leaves your device.
Key Features
The LED Resistor Calculator models the classic series loop: source, resistor, LED.
| Feature | What It Does | Example |
|---|---|---|
| Supply voltage | Voltage feeding the circuit | 5 V |
| LED forward voltage | Per-LED drop from the datasheet | 2.0 V (red) |
| LEDs in series | LEDs sharing one resistor | 1 |
| Target current | The drive current you want | 15 mA |
| Ideal resistor | From Ohm's law | 200 Ω |
| Closest E24 value | Standard part you can buy | 220 Ω |
| Actual current | What the E24 part really delivers | 13.6 mA |
| Power and rating | Dissipation plus recommended wattage | 41 mW → 0.25 W |
| 4-band color code | Bands for the recommended part | red red brown gold |
Results update as you type, and the wattage recommendation doubles the calculated dissipation — the standard derating habit.
How to Use
- Enter the supply voltage. Whatever feeds the circuit: 5 V from USB or an Arduino pin, 3.3 V from an ESP32, 12 V from a vehicle.
- Enter the LED forward voltage. From the datasheet: red is typically about 2.0 V; blue, white, and pure green sit near 3.0–3.4 V.
- Set the number of LEDs in series. Leave 1 for a single LED; each extra LED adds its forward voltage to the drop.
- Enter your target current. 5–20 mA is typical for 5 mm indicators; check the datasheet maximum first.
- Read the results panel. Ideal resistance, closest E24 value, actual current, power with wattage rating, LED power, and the color code.
Ohm's Law in Service of LEDs
An LED is not an ohmic device — above its forward voltage its current rises almost vertically — so you cannot simply divide supply voltage by the LED. Instead, you let the resistor drop whatever the LED does not use:
R = (Vsupply − Vf) / I
The resistor absorbs the difference between the supply and the LED's forward voltage while carrying the current you want. From a 5 V supply, an LED holding 2.0 V leaves the resistor 3.0 V. At a target of 15 mA, R = 3.0 V / 0.015 A = 200 Ω.
Real resistors come only in preferred-number series, and E24 (5% tolerance) is the most common in drawers. The calculator snaps the ideal 200 Ω to the nearest E24 neighbor — 220 Ω — then reports the truth: the actual current becomes (5.0 − 2.0) V / 220 Ω = 13.6 mA, safely below target. Snapping down to 180 Ω instead would push current to 16.7 mA.
Next comes heat. Resistor power is P = I²R: (0.0136)² × 220 ≈ 0.041 W, about 41 mW. The rule of thumb — which the calculator applies — is to double the calculated dissipation when picking the wattage rating. Double of 0.041 W is 0.082 W, so the ubiquitous 0.25 W part is plenty; 0.4 W of dissipation would call for a 0.5 W package.
Series strings change one term. Two red LEDs drop 4.0 V, leaving just 1.0 V of headroom from 5 V — R ≈ 67 Ω. Three red LEDs from 5 V is impossible: their combined 6.0 V drop exceeds the supply. That is the voltage headroom principle — keep a volt or two of margin so the resistor keeps authority over the current.
The worked example in one place: 5 V supply, red LED with Vf = 2.0 V, target 15 mA → ideal R = 200 Ω → closest E24 = 220 Ω → actual current = 13.6 mA → resistor power ≈ 41 mW → rating = 0.25 W → code red red brown gold.
Practical Use Cases
Arduino and breadboard projects
An Arduino pin sources 5 V and should supply no more than about 20 mA; a red indicator at 15 mA needs the familiar 200 Ω, and 220 Ω keeps the pin inside its limit. On 3.3 V boards the smaller headroom makes the exact E24 value matter more.
Indicator panels
A dozen status LEDs are a dozen calculations, often across colors whose forward voltages differ by a volt or more. Run each color through the calculator separately for a tidy list of E24 values instead of guesswork that leaves half the panel dim.
12V automotive LEDs
Vehicle electrics sit near 12.6 V at rest and 13.8–14.4 V with the engine running. A red LED from 13.8 V leaves 11.8 V for the resistor; at 15 mA that dissipates roughly 0.18 W — fine for a ½ W part, not a careless ¼ W one. Size for the charging voltage.
LED strip segments
Analog 12 V strips are built from segments, each with its own current-limiting resistors, and custom installs often cut and re-wire them. Calculate per segment and sum the currents to size the power supply.
Best Practices
- Never skip the resistor. "It worked without one" is how one-time-use LEDs are made; current limiting is mandatory above the forward voltage.
- Pick the next E24 value up, not down. The higher resistance errs toward less current and a cooler LED.
- Check Vf from the datasheet. Colors and chemistries differ; guessing 2.0 V for a white LED inflates the current.
- Watch total current against port limits. Sum LED currents per bank and compare with pin and regulator ratings.
- Leave headroom in series strings. If the total forward drop creeps near the supply, regulation degrades.
- Re-run the numbers when the supply changes. Battery sag and adapter tolerances shift the resistor's share.
Light It Up, Safely
The math takes thirty seconds when a calculator does it — and saves an LED when done before the first power-up. Open the free LED Resistor Calculator, enter your four numbers, and walk away with an E24 value, the true current, a wattage rating with margin, and the color code.
Related Tools You Might Like:
- 555 Timer Calculator — Frequency and duty cycle for the circuits your indicators live on.
- Ohm's Law Calculator — Solve any voltage, current, and resistance triangle.
- Resistor Color Code Calculator — Decode and encode 4-band and 5-band parts.
Happy building!
Frequently Asked Questions
Q: Why does the calculator suggest 220 Ω when the ideal value is 200 Ω?
A: Resistors are manufactured in standard series, and 200 Ω is not an E24 value. The nearest E24 neighbors are 180 Ω and 220 Ω; the calculator reports the snap plus the actual current and power the standard value produces, so you can judge the trade-off instead of guessing.
Q: Can I put several LEDs in parallel across one resistor?
A: It is not recommended. Parallel LEDs with slightly different forward voltages share current unequally, so one hogs the current and ages fastest while its neighbors stay dim. Use one resistor per LED, or wire LEDs in series behind a single resistor.
Q: What wattage rating should I actually buy?
A: Take the dissipation P = I²R and choose a rating at least double it. A 41 mW resistor is fine at 0.25 W; 0.2 W of dissipation calls for a 0.5 W part.